Friday, August 30, 2013

Freebie Friday - Fanciful Florals

And I'm back again with more textile textures resources!

Today I'm sharing some floral pattern textiles. There's plenty of floral patterning happening in my close, so there will be a 'part 2' in the future. Oh, how I love floral fabric designs. I recently bought a dress in part because it reminded me very much of a tea set I used to admire at my grandma's house.

Anyhow, here you go guys - some colourful, cheerful florals!


To download the full set of 6 you can go to my {DeviantArt page}

Again, feel free to use these resources for personal or professional projects but please:

Do not claim the original resource images as your own,
Do not redistribute commercially. Basically, don't save and sell the resources as your own, but by all means do share the link to this page with others. :)
Do not use these textures as a base to create your own stock art/resources.

And, please share anything you've made with these resources with me. I'd love to have a look! =)

Some previous Freebie Friday posts:

Vintage Inspired
Green
Red
Denim

A good weekend to you all!

Tuesday, August 20, 2013

Tutorial - Quick & Easy Image Transfer on to Linocut Blocks

Happy Tuesday and welcome to my first ever analog tutorial!

Writing yesterday's blog post I mentioned that I was surprised that I couldn't find this method elsewhere on the internet, and  thus came my desire to write my own photo tutorial.

This method is super easy, super fast, and pretty inexpensive. No special solvents or tools required. You'll be carving and printing in no time at all. And if there is another similar post out there somewhere, all the better - more tips and tricks from different sources to go around. Anyhow, enough chatter. Let's get to the photo demo/tutorial that I promised.

*Before I begin, I'll have to say that I did not discover this transfer technique on my own. I learned this technique at university, in a class taught by Mr. Adam Rogers. I'm sorry if this was supposed to be a secret, though I don't think that's the case.

Finally. I present to you: "Iron on the Image - the Quick, Easy, and Accurate Way of Transferring a Picture to Linoleum Blocks"
(A long title, alas)


MATERIALS:

1. Your choice of a linocut block. (I worked with the medium-softness, thin, charcoal-grey coloured kind)
2. A photocopy or printout of your image using a xerox machine or laser printer. THIS IS IMPORTANT. Otherwise the transfer won't work, or won't work as well. (Also, you may want to photocopy an extra copy, just in case you make a mistake during the transfer and want to restart)
3. Clothing Iron
4. Pencil
*Q-tip, paper towel, or cotton round + nail polish remover (In case of accidents)

PROCEDURE:

Step 1: Select the image you wish to turn into a linocut print and turn it into a black and white image, if you haven't already. Since we'll be transferring this image on to a piece of linoleum that might not be white, we want as much contrast as possible, so we'll be able to see what we're cutting out later.

Step 2: Print out or photocopy your image either by printing with a laser printer or getting a good old photocopy from an office, or an office supply store. This is very important as images printed with inkjet printers don't tend to transfer well using this method. The reason being is that with the laser printer/xerox - more of the ink sits on top of the paper and therefore this ink can be easily released on to a new surface by being reheated and pressed, as we'll be doing later.

Step 3. Trim your sheet of paper to be slightly larger than the linocut block, so it will undoubtedly cover it completely. The reason why the paper has to cover the linoleum completely is because the heat from the iron can melt the linoleum and then the linoleum surface is all weird, it smells nasty, your iron is all dirty, and all that other annoying stuff that that delays your artistic process. IF you're working with a linoleum piece larger than the paper you printed on, you can always find a larger piece of paper and paste the paper with your image on to that. I also recommend printing a border (the size of your lino block) around your image to make registration very straightforward.

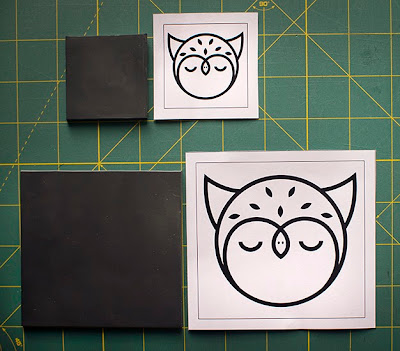
Block A (top) Block B (bottom)
As you can see, I printed my images with such a border, making placement of the lino block on to the paper later super easy.

Step 4:  Go to a light table or a brightly lit window and with a pencil, mark off the corners of the border on the reverse side of the paper.


I like to do this so that when I'm ironing I know where the lino block and image are beneath the paper.

Step 5: Set up your ironing board or table, plug in your clothes iron and let it heat up to a low temperature setting. Mine was on "1- Acrylic". (*Of course, irons many vary in their temperature settings, so it is best to do a couple of small tests before working with the final lino block) We don't want it any hotter than that because I've found that hotter temperatures melt the ink too much and it become a bit blurry when being transferred. While the iron is taking a moment to heat up, we're going to line up our picture and linoleum piece.
Put your paper down on your ironing station - image side up and then place the lino block on top, lining it up with the handy border we printed. Then, holding the two pieces together carefully, we're going to flip them so that the lino block is at the bottom.
Double check that the border and the linocut block are still lining up. And if your iron has heated up, then we are ready to proceed to the next step.

Step 6: Very carefully start ironing over the paper. Use slow, smooth, short motions, and don't press down too hard. Like a gentle, slow-motion wiggling movement perhaps? Or a massage?
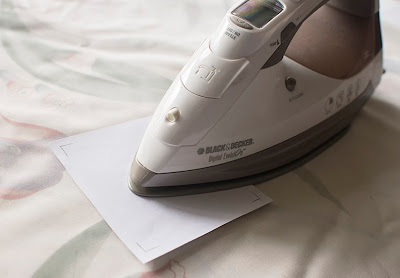
"Massage" the paper

If you can, hold down one of the corners of the paper/linocut block duo to prevent the paper from slipping. After "massaging" the paper with the iron for about 30 seconds, your image should have transferred to the linoleum block.

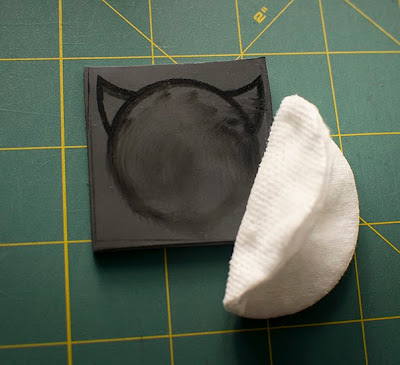
Step 7: Remove the iron and carefully peel off the paper from the lino block.
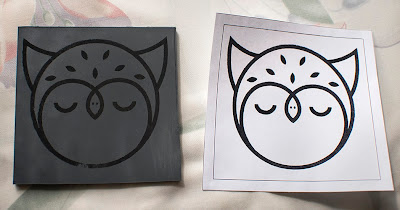
Results from the Block B transfer

As you can see, we have an accurate, near perfect transfer. I must have missed the spot on the bottom, but if you iron evenly you shouldn't have this issue. Now, you'll notice that your linocut piece will be quite warm (even hot) and soft. Set it aside and let it cool down before proceeding to the carving stage.

And that's it! See, wasn't that speedy and easy? And much less messy than using transfer liquids or glues, carbon paper, or redrawing your image a bunch of times?

HOWEVER, if you peel your paper off and the image has smudged because you accidentally moved the paper as you were ironing, don't panic. There is an easy fix to this "oops".
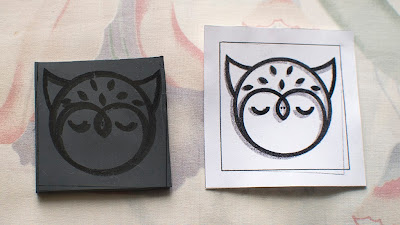
Oh no, I made a mistake transferring Block A, but that's ok!

*Take a paper towel, q-tip, or a cotton round and dab a little bit of nail polish remover on it. Apply it to the linoleum and wipe away the mistake.
Ink is starting to come off quickly, cleanup taking only a few seconds.
The ink will come off easily and you'll be ready to try again. Best results are achieved when you clean up soon after the transfer, though even weeks later most of the ink will come off leaving perhaps only a light, barely noticeable shadow of your previous attempt.
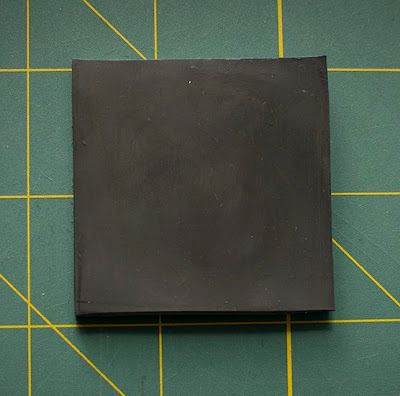
All clean and ready to be used again!
Now, we can try transferring the image again with the help from our iron. I don't recommend using the same piece of paper that we've just used because the transfer result tends to be less dark with chunks missing. It's best to use a new, unused copy/printout for the most accurate results, especially if you're planning to have a detailed linocut art print.

Here is my second attempt and it's a success!
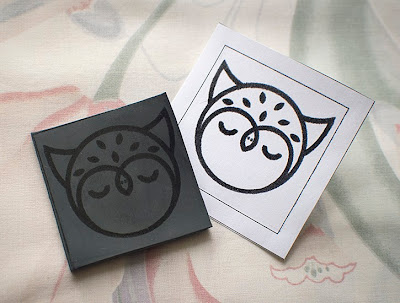
If you've ironed on the border and that's a concern to you - take a q-tip dipped in nail polish remover and wipe away those parts only.

Well, it's a success for the most part. If you've clicked to view the image larger you may have noticed the lines on this transfer aren't as crisp as on the first one I showed. This is because I heated my clothes iron to a higher temperature and "massaged" the paper for too long. It's nothing too terrible and I won't be going for a third attempt to transfer, but it's a good thing to keep in mind if you want to be super precise. Use the lowest heat setting and don't keep ironing for the fun of it. Just apply a firm but gentle hand, make sure you've gone over your entire image, and you're done.

The end!
I hope this was helpful! If you have any questions - feel free to ask. And if you'd like for me to do a tutorial based on some of techniques you may have spied in my work or previous posts, please don't hesitate to let me know and I'll do my best to make one. I'm considering making video tutorials in the future since I now have a pretty decent video setting on my new camera.

Cheers!

*All images in this post (especially the owl logo) are ©Mariya Olshevska.

Monday, August 19, 2013

Do It Yourself Linocut Stamp

Hi there! It's Monday!

For a while I've been thinking about getting myself a rubber stamp with my logo on it so I could put the "owl seal of approval" on envelopes, letters. packages, and other merchandise that I may gift or sell to someone. Not being sure if I want to commit to ordering a custom made stamp with uncertain quality results, I decided to try and make my own stamp using the linocut method. So, I got myself a small piece of medium-hardness (charcoal grey coloured) linoleum from the art store and got to work.

I converted my brand logo to black and white and printed it out on a piece of paper. I printed the logo at 2 x 2 inches. It seemed like a good size for a stamp, though it might not be so easy to cut out the details of the owl.

Add caption
I then transferred the image from my paper on to my linoleum piece and cut out my image with my Speedball Lino Cutter Assortment (#1). The set looks like this:

But you may be thinking - how did I transfer the image from the paper to the linocut piece?
To answer that I actually just tried searching online for a video or photo tutorial using my method and nothing came up. So, I'm off to do a quick photo demo and I'll post a tutorial TOMORROW. =) It's such a quick and easy method. You'll love it, just you wait. In the meantime...

Since I wanted the logo to transfer without a background I had to cut away a whole bunch of stuff. For the most part I used the thinnest number 1 and 2 blades, because my logo was detailed. Even so, I quickly realized that I didn't have time to fuss around the owls' feathers and nostrils so I decided to emit those for the sake of my sanity. (That day anyway) I even got somewhat impatient and with an x-cto knife cut away part of the face...which I realized was not a swell idea. It would have been smarter to leave it and after finishing cutting to attach a handle on the back so I could easily use the stamp on an ink pad. Just one of those less clever days I guess.

Bottom to top - my printed image, the linoleum stamp(ish) thing, and the 1st test print.
Quick test run of the stamp. The really "hand made" look is achieved.
So here we have a couple of test runs of my do-it-myself linoleum stamp. I just brushed some acrylic paint on it with a brush, so the colour is uneven. The proper way would have been to use a little roller to put on the paint, but that was too much of a fuss at the time. I'll try it that way soon.


I have some linoleum left, so I'm going to do a larger version of the logo, or go for an reversed colour look inside a circle, which may also look nice. There's a lot of things I want to fiddle with and there are only so many hours in a day...so we'll see.
But one thing's for sure - the super quick and super simple image transfer on to a linoleum block tutorial is coming tomorrow. 

All images in this post (especially the owl logo) are ©Mariya Olshevska.

Friday, August 9, 2013

My Patternlicios Etsy Shop

Yes! Finally opened up my Etsy shop, which I've been intending to do for a while.

The happy little box family

It's not exactly reflective of my current illustration and photography work, I suppose, but it expresses my love for patterns and hand-painted objects! So far I have 4 decoratively patterned boxes available and soon there will be patterned canvases, lino-cut prints, art prints, bookmarks and other embellished goodies for sale. Custom designs are also available via requests at my shop.

I'd appreciate if you had a look. Here's the link to {Pattern Pastimes}.
If you have a shop, send me a link back!

Here are some photos of my goodies below. They're perfect for safekeeping jewelry, buttons, feathers, shells, rocks, cards, baby teeth, and anything else you can imagine that fits!


Top View


See, perfect for your postcard collection
Top
 
Photos are ©Mariya Olshevska

Here's the shop link again: {Pattern Pastimes}

Have a great weekend!

Wednesday, August 7, 2013

Art Week Sneak Peeks

Hi there!

So the past week has been fairly interesting.

Overseas, from July 30th to August 3rd, the Mail Me Art - Short & Sweet exhibition went up at the Framers Gallery. And the second show at the Factoryroad Gallery is happening this week from August 8th to the 12th. If you're in the UK area - go check it out.

Here are a few pictures I found from the show with my piece in them through the magic of the internet:

Photo courtesy of MMA
Photo by Bruce Richardson
Check out some more pictures from the show on the Mail Me Art blog page. And check out the MMA3 books and prints for sale here: MMA3 shop. And of course here are links to my original piece for purchase (all proceeds go to charity) and the limited edition prints (all proceeds go to help me create more art ;) ).
And about the same time as the exhibition was going on - my copy of book came in!
Get your copy for only £12.99

Anyhow, I really wish I could have been there, but hopefully I'll get to go to England soon enough, possibly even for the Mail Me Art 4 show which I'm going to participate in.

Meanwhile, back in Vancouver, from August 1st - 4th I was with the Rain City Illustration Club at the Yellow Crane Festival enjoying all kinds of weather and selling artwork from our club members.

Here's us setting up our tent. Left to right we have: Pandora Young, yours truly, Sydney McKenna, and Michele Miguel.

The cards section
Table displays
A glimpse of our tent on one of the days. We'd mix things up every day with the layout.
Here's us again, looking all happy.

Krista Gibbard's lovely work

Our club calendar!
On the second day it started to rain and puddles began to appear by our tents. Quite a few people wouldn't notice them and step in them, to their surprise. So, Pandora had the brilliant idea of getting rubber ducks and letting them swim in the puddles - to warn people of the growing lakes happening all around.
Vancouver weather - she put a bird on it!

There were multiple duckies in each puddle along the festival art alley
It worked! Stepping in the puddle was avoided!
On the contrary - as effective as the ducks were at keeping the adults' feet dry, they drew in twice as many children to jump in and get wet. For the rest of the festival days the ducks were a hit with the little ones. (And they were also immensely popular with the photo loving ladies and gents)

Photo courtesy of Pandora
During the slow hours some of us sketched. I drew a little something everyday. Here's my favourite drawing:


Overall, the festival was a fun experience. It was great to talk to some nice people from out of town and from the area and tell them about our club. I sold quite a few cards so that was exciting as well. Not sure if we'll set up shot at the next year's festival but we've definitely learned lots and we'll hopefully be looking into representing the club at other arts & crafts events.

Michel and I after the last day of the festival managed to ambush Stephen Silver after his Schoolism workshop and got him to sign our sketchbooks! He was very nice about it too :)


On a final note, I've been working on some of my own fun, pattern inspired art and crafts projects and I'm eager to open an Etsy shop sometime at the end of the week. I'm off editing product photos as soon as I finish this post! Here's a preview of my merchandise below. I also have patterned canvases, lino-cut prints, and more in the works!

Up-cycled, hand painted, wooden treasure chests.

Happy Wednesday!